Using PERPHeads Assets and Paralake in Source Filmmaker
Following the recent Community Photographer Event and the announcement that entries have been re-opened, I asked @Fredy for his thoughts on publishing a guide on how to get the content from PERPHeads and the Paralake map working in Source Filmmaker (SFM) and believed it was a great idea as there is definitely talented people within the community and it would be an excellent opportunity to see what people could make using the power of SFM.
This guide will:
- briefly outline what SFM is.
- how to extract the PERP content from Garry's Mod.
- how to mount the PERP content into SFM.
- how to get Paralake V4/V5 to work in SFM.
- give out general tips and advice on using PERP content in SFM.
For those unfamilar with the software, SFM is a free, open-source software based entirely in the Source engine released by Valve back in 2012. Valve has been using SFM to make their animated shorts and promotional material such as Team Fortress 2's Meet the Team series, Left 4 Dead 2's opening cinematic, CS:GO's cinematic trailers and more. SFM comes with full Steam Workshop support, a built-in modified version of Team Fortress 2 and a usermod directory for custom models, materials, maps, sounds, etc. that aren't found on the workshop.
As you've probably seen around the forums from me, then you'll know I've been using SFM for a long time and have been using it and PERP's assets to make high quality renders - most of which are being used in the current loading screens! I have also dabbled in animation and some of my work can be found on my YouTube channel. (Maybe in the future I might make an animation based around PERP).
Anyway enough about me, you can get Source Filmmaker here: https://store.steampowered.com/app/1840/Source_Filmmaker/
Once you've done that, you can move on to the next step of the guide.
Extracting the PERP content from Garry's Mod
In order to extract the content from Garry's Mod, you will first need to navigate to the following directory:
Steam\steamapps\workshop\content\4000
Once here, you will need open the following the following folders:
- 2897742669
- 2103606343
- 2894498893
Steam\steamapps\common\GarrysMod\bin
Once here, locate the program called gmad.exe. This is how Garry's Mod reads .gma files but it can also be used to unpack them into folders that we can then mount into SFM. In order to unpack them, simply drag the content.gma onto gmad.exe. This will then open a window for a few moments with gmad.exe as it extracts the content. Once complete, you will see inside the same folder that a new folder has been created called content. This contains everything you will need for the next step below.
If you want your content to remain up-to-date, make sure to re-extract the content and re-mount into SFM so you have the latest models and materials when they release.
Mounting the PERP content into SFM
This part of the process is quite straightforward. Now that you have your content and you can see the different folders inside, all you have to do is:
- Select all of the folders inside the content packs folders (models, particles, materials, etc.) and cut/copy them
- Locate your usermod folder. The directory is typcially Steam\steamapps\common\SourceFilmmaker\game\usermod
- Paste the folders into the usermod folder. This will automatically merge and organise the folders with the same names.
- Repeat the process with the extracted content folder.
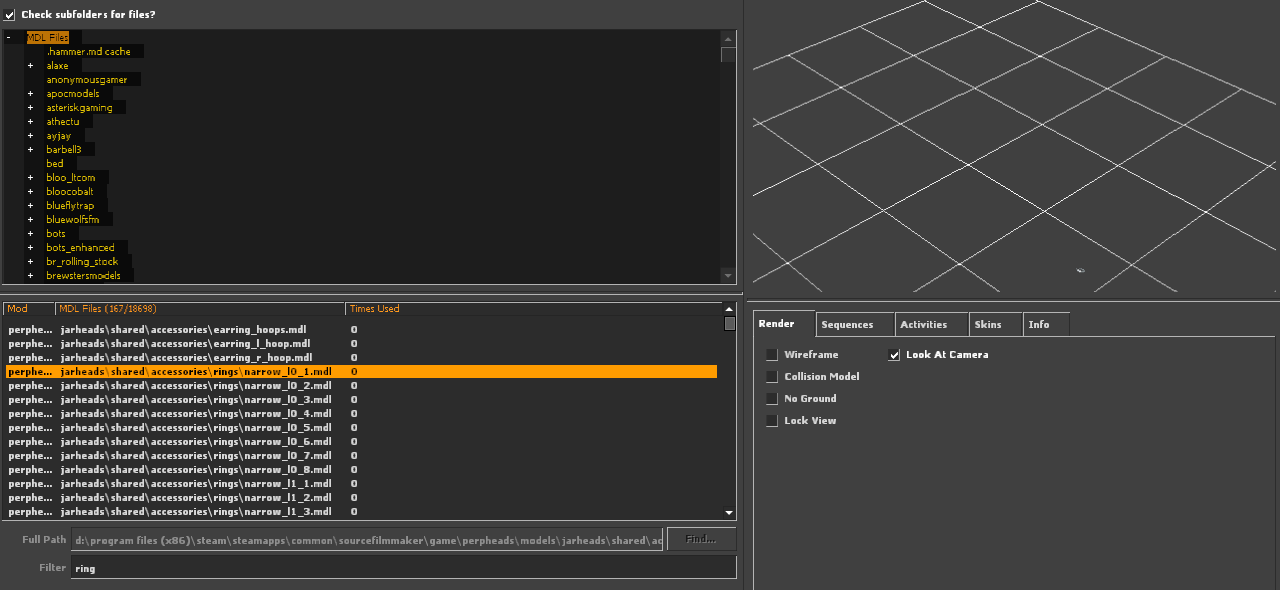
The PERP content should now be fully mounted into SFM. You can confirm this by launching SFM, opening the Create Animation Set for New Model menu in the Animation Set Editor and typing, for example, jarheads. You should see a bunch of models like this:
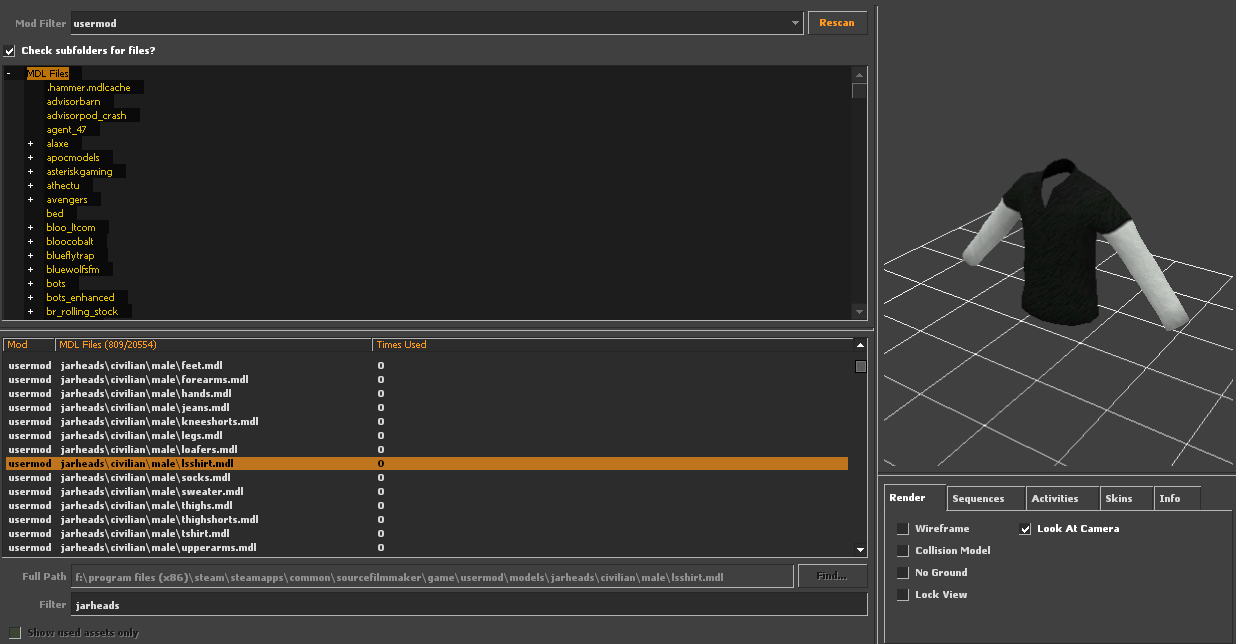
This confirms that the content has been successfully mounted and that SFM can view them and load the models in. We can now move onto the next part of the guide.
Getting Paralake V4/V5 to work in SFM:
Thanks to the work @Lelios1 did for me, he split the map up into three different maps: the City, the Business Sector, and Subs/Forest area. Because of this, these sections weren't hitting the entity limit and thus this allowed SFM to load these areas without issue. Therefore I will be sharing these areas of Paralake V4 here: https://mega.nz/folder/eQEzSKSK#AeGUAGWFgDNkAZ9kO4bL6g
Mounting the maps pretty much follows the same process as mounting the content. Copy/Cut the maps and go to <Drive Letter>\Program Files (x86)\Steam\steamapps\common\SourceFilmmaker\game\usermod\maps and paste them there. When you go to load a map in SFM, you should see these in your map selection list in the usermod directory.
NOTE: Just like PERPHeads, you will need to mount the CS:S content into SFM in order for all of the textures to properly load otherwise you will get purple/black boxes or ERROR messages. Follow the same process as mounting the PERP content into SFM. If there are still issues, extract the Paralake City V4 and Paralake City V4 Content via the Content Extractor and mount them into SFM.
So in order to get around this, I gave myself a brief crash course in Hammer and essentially split the map up into two version
The two versions that are available are:
- rp_paralake_city_v5_city.bsp - The City area of Paralake
- rp_paralake_city_v5_busisubs.bsp - The Business Sector, Forest and Suburbs areas of Paralake
Mounting the maps pretty much follows the same process as mounting the content. Copy/Cut the maps and go to Steam\steamapps\common\SourceFilmmaker\game\usermod\maps and paste them there. When you go to load a map in SFM, you should see these in your map selection list in the usermod directory
Now, before you load the map, you need to input the command r_hunkalloclightmaps 0 in the console or set it as one of your launch options in SFM as +r_hunkalloclightmaps 0. The map will not load and will crash SFM unless this command has been inputted in the console or set as a launch option.
Once you have successfully loaded the map, you will notice that the skybox buildings appear to be missing. This is normal as they are not spawned in by default on SFM. In order to spawn them in, press F11 to enter the modified Team Fortress 2 game. Use noclip to fly to the general area where your render will be taking place and press F11 to exit TF2. Then press the Record Game button and click Record. This will re-open TF2 but all you need to do is press Esc and it will exit out of TF2 once more. But now the skybox buildings have been loaded in.
Another thing you will notice is that the sky is black and has no sky texture at all. This is because of the custom day/night cycle PERP has. However, this can be easily rectified by using the console command sv_skyname <skyname texture>. You can find a list of sky textures here: https://developer.valvesoftware.com/wiki/Sky_List.
Alternatively, you can download from the Workshop some sky dome models and place them in the skybox which can act as your sky, this is what I've used for the majority of my renders
Another thing worth noting is that some water textures appears to be broken. As far as I'm aware, I have not been able to find a fix for this yet so you may just have to improvise by using water models from the workshop or just avoid areas with water altogether. Nonetheless, this is only a minor issue.
General tips and advice with using PERP assets in SFMNow that you have PERP's assets and Paralake working in SFM, I'd like to give out a few pieces of advice and useful tips that you can use to make your characters and scenery in SFM stand out more in your renders.
UPDATE 07/10/2021: The enhanced models mentioned in this guide are no longer necessary due to the PERP HL2 models' facial controls being fixed
Firstly, I would strongly advise subscribing to the "Enhanced Citizens" workshop addon here:

Steam Workshop::Enhanced Citizens

- $basetexture - a string attribute that overides the default material path where the model retrieves its textures from
- $color - a color attribute changes the colour of a model. $color2 is utilised when $color does not change the colour
- $alpha - a float atrribute that makes a selected area of a model invisible by not drawing it
- Spawn in your model through the Create Animation Set for New Model menu. For this instance, I will be using lsshirt.mdl (AKA the sweater shirt)
- Right click on the the model in the Animation Set Editor and select Add Override Materials
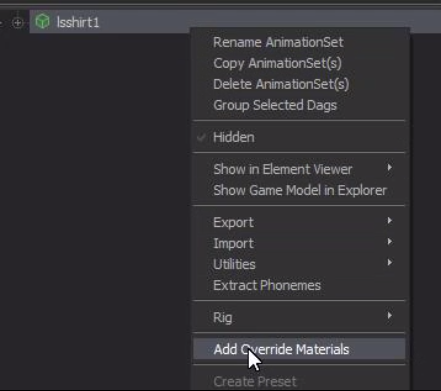
- Right click again on the model and hover over Show in Element Viewer and select model from the drop down menu. SFM will now switch to the element viewer with the model selected. At the bottom of the list you will see materials in yellow text. This confirms you have added overide textures and now we can move on to the fun part.
- From the dropdown, right click on the green lsshirt_1, hover over Add Override Materials and select string. From there, input $basetexture and press OK.
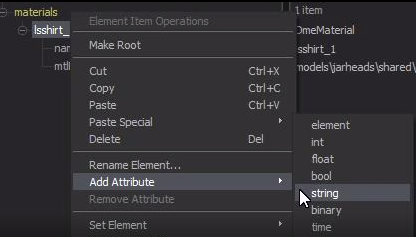
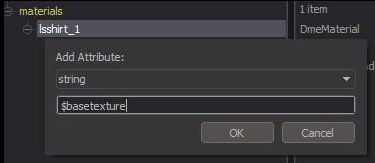
- Now that the shirt's texture has changed to be the purple and black boxes, you will have also noticed that in the element viewer that $basetexture has appeared and in the next column you can type in it. This is the new material path where SFM will read the material textures from. As clothing such as the suit top, leather jacket, etc are re-skins of the sweater shirt, copy the texture path from mtlName (Which is models\jarheads\shared\clothing\lsshirt_1) and paste it in the $basetexture input box but change the number on the end. For example, changing it to 9 will load the suit top texture:

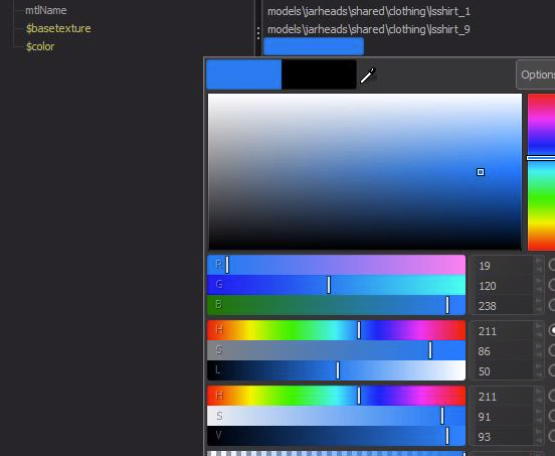
- Repeat Steps 1, 2 and 3 from the $basetexture tutorial above.
- From the dropdown, right click on the green lsshirt_1, hover over Add Override Materials and select color. From there, input $color and press OK. If $color does not change the colour, use $color2 instead. (This forces the material to use the colour) Your model should now appear a black colour
- In the element viewer, you should now see $color with a coloured box in the next column. From there you can select a colour or use an RGB code to search for a specific colour (useful for making organisation renders, etc).
- Repeat Steps 1, 2 and 3 from the $basetexture tutorial above. In this example however, we will be using male_07 from the Enhanced Citizens workshop addon.
- From the dropdown, right click on the green citizen_sheet, hover over Add Override Materials and select float. From there, input $alpha and press OK.
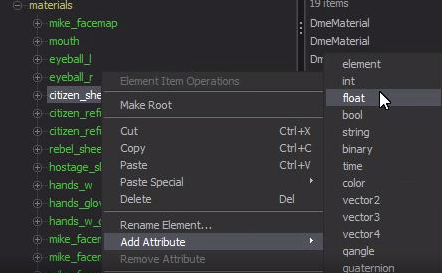
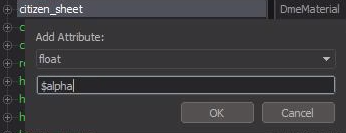
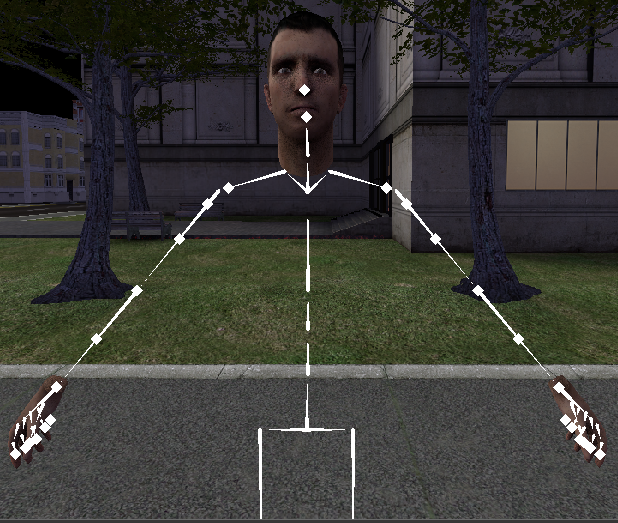
- Your model should now appear invisible for the section you have selected. In this example, citizen_sheet makes the model apart from face and hands invisible.
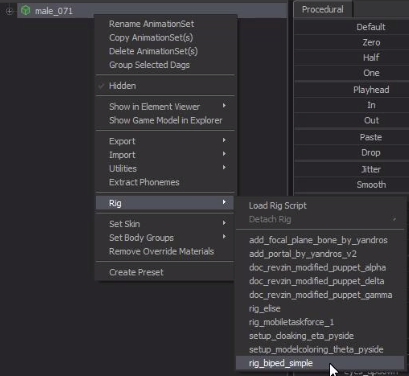
Thirdly, when you're posing your characters in SFM, use rig_biped_simple. Trust me, it makes your life 10 times easier when trying to pose a character. To add a rig onto a model, right click on the model and hover over the Rig option. From there, select rig_biped_simple and the rig will be automatically applied to the model.
Fourthly, in order to get the clothing attached to your characters, you will need to lock the clothing models (child model) onto the character (parent model). This parent-child system means that whenever the parent model moves, the child model will move exactly the same way as the parent. Bear in mind that when using the PERP clothing, the enhanced HL2 models don't have necks as they were designed without PERP's clothing in mind and were never intended to have custom clothing on it. This means you should spawn the jarheads playermodel say, for example, male_07 and use the $alpha guide above to make all of the body apart from the neck invisible and then lock the playermodel to the enhanced model. Then lock the clothing model to the enhanced model. When the models are locked together, you may need to adjust the child models slightly so that the whole character when all the models are locked together appear natural as if they are just one playermodel.
- Spawn the models in that you want to use. Once that has been done, click on the little (+) to left of the model name, it will show you all the bones.
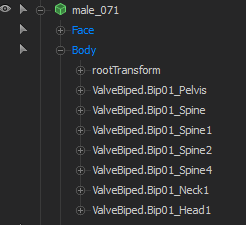
- Click on the (+) icon on the model you intend to be the child model. You will notice that they have the same bone names. For example, ValveBiped.Bip01_Pelvis
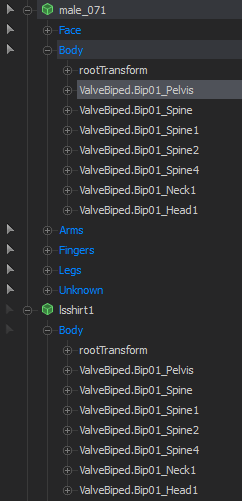
- Drag the model bone from the parent onto the child bone with the same name. In this instance, the rootTransform of the parent will be locked to the rootTransform of the child. A GIF of this can be viewed here https://gyazo.com/4034259c72808400a29a8f2ac9ee92f6
- Repeat the process for every bone in the child model. This is without a doubt the most boring and tedious part of the process but it ensures that everything will look correct.
- Once all bones have been locked, select the child model (in this instance lsshirt1), select the child model and in the Procedural tab, drag the Zero slider all the way to the right. This zeros the child model onto the parent model so that it will be in the same position and move when the parent moves.

And finally, just experiment and play around with all of SFM's tools. There are a large variety of tools available within the software as well as a bunch of videos on YouTube and guides online which can be used as tutorials to gradually improve your work. There is a learning curve to using SFM but once you've gotten the hang of it, you'll be making high-quality renders (and maybe even animations) in no time!
If you have any questions, do not hesitate to ask me in this thread or privately message me!
Last edited:


")